Writing Portfolio

November 29, 2018 by jromero

A Beginner’s Guide to Choosing the Best Boxing Gloves for Women

A Beginner’s Guide to Choosing the Best Boxing Gloves for Women

Over the past few decades, more women have become involved in the wonderful world of boxing. With this comes the need for boxing equipment that is well suited for a female, along with the proper education on how to choose the best boxing gloves.

Selecting the appropriate gloves is essential to protecting yourself, as well as your opponent. You will want to consider a few important elements when deciding upon the boxing gloves that are right for you.

  • The glove type determined by its intended use
  • Glove size for a safe and comfortable fit
  • Glove closure based on preference
  • Materials used in the construction of the glove
  • The brand’s reputation

Whether your goal is to get into shape, become a future pro fighter, or just have some fun, I hope my beginner’s guide to choosing the best boxing gloves helps you reach your full potential.

Does My Activity Determine the Type of Women’s Boxing Gloves I Would Need?

If you are currently searching for that one perfect pair of women’s boxing gloves, you may come to the conclusion that you could require multiple pairs for the various boxing activates you are involved in. This is where the glove type comes into play.

I have compiled a list of common boxing activities that women are involved in and their corresponding glove types so that you can gain a better understanding of what would be best for your situation.

Sparring Gloves: These type of boxing gloves are constructed to protect the sparring partner, as well as your hands. They are typically around 16 oz due to the amount of padding needed to soften the blows and absorb the shock. Sparring gloves are perfect for developing your technique and skill as a new boxer, and are great for women to work on their endurance and stamina.

Bag Gloves: As the name suggests, these particular gloves are typically utilized in hitting heavy bags and other specialty bags while training. The main purpose of this type of glove, specifically modern bag gloves, is to protect the hand. With that being the case, you should not use them for sparring with a partner due to the fact that they do not offer much “give” or resilience.

Training Gloves: If you are a woman who is just starting her boxing journey, and unsure as to what type of glove you may want, training gloves are a great option since they are designed to have multiple uses. Used for training purposes, they are firm enough for bag work, and have enough shock absorbency for sparring.

Traditional Fighting/Competition Gloves: If you plan on competing against other women in the boxing ring, these are the gloves for you. Fighting gloves are designated solely for competing, and are normally pro grade. They have less padding, are constructed for speed and power, and designed to inflict maximum damage. There are regulations that set the standard weight of the gloves that can be used during competition, but they are typically 8 0z to 10 oz. In addition to this, there are two types of fighting gloves – amateur and professional.

Aerobic Gloves: Cardiovascular exercises such as cardio kickboxing and aerobic boxing are a great way for women to keep fit. When searching for the best women’s boxing gloves for this activity, you will find that its typical for gloves advertised as aerobic to be poorly made. Be sure to purchase gloves that are of higher quality if you want them to last.

Do Specific Fighting Styles Require Certain Gloves?

Muay Thai and Mixed Martial Arts do require specific gloves. Take a look at a few details that pertain to these styles of fighting and their glove requirements.

Muay Thai Gloves: If you are going to participate in Muay Thai boxing, you will want to invest in a pair of gloves that are specifically designated for this style of fighting. The gloves look similar to traditional boxing gloves, but they are less stiff and therefore allow the fighter to grip their opponent to take them down. There is extra padding on the back of the gloves to better absorb kicks, and the thumb area allows for better cinching and grappling during combat. Like traditional boxing gloves, you will want to pick the best glove for you based on your activity, which would be bag work, sparring, training, clinching/fighting. There is no difference between a man and woman’s Muay Thai boxing gloves, however, you may want to choose a lighter glove that is 2 oz to 4 oz lighter than what a man would require.

Mixed Martial Arts (MMA Gloves): Women interested in MMA fighting should only use specific MMA gloves. Using traditional boxing gloves would put you at a disadvantage. MMA gloves have exposed fingers to allow for holding and grappling. As with Muay Thai gloves, you would utilize a glove that is meant for a certain activity. Be sure the gloves you select have a solid velcro wrist strap to ensure they stay in place and are secure around your fist.

What Size Woman’s Boxing Gloves Would I Need?

After you figure out your glove type, you should focus on looking for boxing gloves that fit properly. Your hand should feel comfortable and not forced into the glove. A glove that is too small can be uncomfortable and interfere with your concentration. A glove that is too large for your hand will be loose, leaving room for injury.

While testing out a new pair of gloves, it’s important to wear hand wraps during the process. While boxing, they are essential in protecting the hands, as well as taking moisture out of the gloves.

Boxing gloves quick fitting tips:
  • Fingertips should easily touch the top glove.
  • It should not take too much effort to make a fist.
  • The heel of your hand should rest completely inside the glove and not extend past it.
  • With your hand outside of the glove, hold it up to the back of the glove, simulating your hand being inside, your wrist should line up with the end of the glove compartment, and not extend into the wrist section of the glove.
A few notes on sizing specifications:

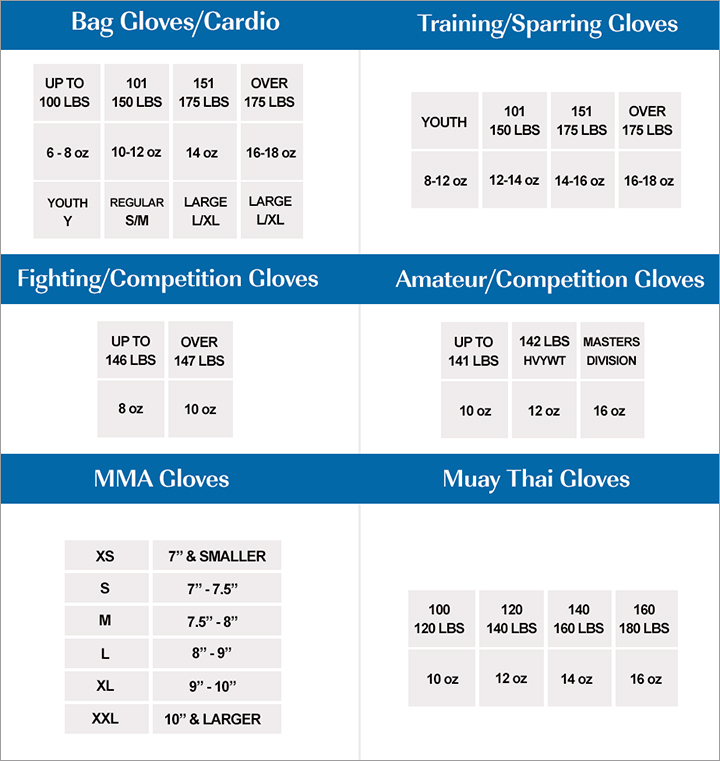
Sizes in Ounces: Boxing glove sizes come in various weights (ounces), with the exception of MMA gloves that are sized Youth-XXL, along with bag gloves that are normally sized both in ounces and Youth-XL. The weight of the glove corresponds with the amount of padding it contains. The weight of your glove is dependent on your activity along with your physical weight. For example, if a boxer’s physical weight is 180 pounds, she will need a 16 oz glove that contains more padding so that her sparring partner is more protected.

Glove Compartment Sizing: Typically, the glove hand compartments can be the same size because they are made from the same mold. For instance, a 12 oz through 16 oz size glove may have the same size hand compartment with the difference being more or less padding, and the amount of weight in the wrist section to compensate when there is more or less padding. It is when you get into the smaller petite sizes such as 6 oz and 8 oz that the compartment size changes. Additionally, hand compartment sizes can vary greatly from brand to brand.

Take a look at this handy boxing glove sizing chart:

Does the Boxing Glove Material Play an Important Role?

It plays a very important role. I have included a few essential elements to consider when looking for a quality boxing glove.

Leather VS Vinyl Gloves: Boxing gloves made from vinyl may seem like an optimal choice to a beginner, but in reality, leather is always the best choice. Leather boxing gloves would make the perfect addition to any woman’s boxing gear collection. They will stand the test of time, resist tears, and have better breathability.

Good Quality Foam/Padding: A well-made boxing glove will have quality foam that offers great protection for your hand as well as your partner. Certain gloves will contain foam padding that springs back easily for superior protection. You can choose, based on your preference, closed cell foam or open cell foam. Closed cell foam is firm, while open cell foam is softer. The softer foam is easier on the hand and better for those that may have a hand injury. Also, check if there is adequate padding around the wrist so that it will remain stable while punching.

Sweat Resistant Inner Lining: A proper inner lining can extend the life of your gloves. Quality gloves will offer a sweat-resistant and antibacterial lining. This will prevent bacteria from taking over.

Lace-up Gloves VS Velcro Gloves

Deciding to go with lace-up or velcro boxing gloves could seem trivial, but it’s actually important, for a few reasons. Have a look at the pros and cons of these two closure systems so you can make an informed decision.

Lace-Up Gloves: PROS – This type of closure system is said by some to offer better support. This is due to its ability to cinch up for a secure fit. Although not a deal breaker, lace-ups offer the opportunity to talk to other boxers as you ask for their assistance in lacing or unlacing them. CONS – Lace-up boxing gloves are almost impossible to put on and take off by yourself. This can become a problem when training alone.

Velcro/Hook & Loop: PROS – Its best quality is convenience. Velcro provides a fast and easy way for boxers to put on and remove their gloves themselves. CONS – The velcro hooks, or the velcro itself, can possibly degrade your wrap if they frequently come into contact with it. Additionally, a sparring partner can be injured by the velcro if it is not secured properly.

Can You Recommend a Few Brands that Offer Great Boxing Gloves

Although there are many great brands out there, these select few are worthy of mentioning. You may find that you prefer one brand over other for personal reasons.

Here are 10 great recommendations from top female boxers:
  • Cleto Reyes
  • Winning
  • Grant
  • Rival
  • Ringside
  • Title
  • Longsdale
  • Adidas
  • Fighting Sports
  • Pro Mex
Check out these 5 popular MMA glove brands:
  • Hayabusa
  • Fairtex
  • Combat Sports
  • Venum
  • Title

As a woman new to boxing, I realize that finding the best boxing gloves can be a bit confusing. When searching for the boxing gloves that you feel will be right for you, be sure to focus on safety, comfort, and quality. I hope this beginner’s guide to choosing the best boxing gloves for women has been helpful!

Filed Under: Fitness, Sports

September 25, 2018 by jromero

5 Benefits of Utilizing a 3PL Provider

3LP Provider - Shipping Boxes

Whether a new startup or an established company, in today’s competitive world, businesses can greatly benefit from partnering with a 3PL provider. Outsourcing a company’s supply chain management and logistics requirements can be essential. It provides the much-needed time to focus on core competencies, it cuts back on business costs, allows for crucial scalability, and contributes to essential market expansion.

Third-party logistics providers are a behind the scenes catalyst to the success of businesses around the world. This can pertain to inventory management and storage, processing, transportation, assembly, shipping, and other logistics and management processes.

Take a look at these 5 benefits a 3PL provider can offer any e-commerce or brick-n-mortar business looking to jump to the next level or gain a competitive edge.

Third-Party Logistics Allows for Maximized Core Competencies

To successfully build a business in a rapidly growing market, it must run efficiently in all manners of its operations. To accomplish this, a majority of a business’s energy, resources, and finances should be directed towards its core competencies. Assigning non-core responsibilities such as managing inventory, shipping, or warehousing to core personnel can result in a quick take over of their schedules. It will eventually take its toll and stretch a company’s staff thin. In turn, they may work less efficiently, and it can ultimately affect the business’s bottom line and growth potential. Most businesses don’t have the expertise to run every division within their company. Because of this, it’s a wise decision to partner with a 3PL company.

Enables Low Capital Commitment

By outsourcing to a third-party logistics provider, a company can run their business with low capital commitment. Going this route will allow them to avoid large investment costs. This may include obtaining a proper warehousing infrastructure, equipment, transportation, technology systems, a fulfillment team, or costly liability insurance. A 3PL provider absorbs these operating costs, which will allow a company to run without large fixed overheads.

 Outsourcing with a 3PL Provider Allows for an Overall Cost Savings

Achieving lower operational costs is one of the primary reasons a business may decide to outsource their needs. Partnering with a logistics company can deliver significant savings overall and keep a business’s financials on track.

There are many different aspects of cost savings that go hand-in-hand with utilizing a 3PL provider. For instance, eliminating costly steps in the supply chain pertaining to administrative processes. Billing, payroll, hiring, training, and other essential admin duties can add up over time. Additionally, software system updates are often required and costly. A 3PL provider will take on this expense, along with the utility costs to run their operations.

More importantly, a 3PL partner can financially benefit an e-commerce company that relies heavily on shipping. This is because they are able to offer greatly reduced shipping rates. Furthermore, they will also benefit from performance gains. This is true due to the fact that a 3PL provider can easily provide improved accurate order fill rates. With this comes a saving in time, which therefore translates into a savings in cost.

Scalability – Efficiently Handle Volume Peaks and Fluctuating Demand

An experienced third-party logistics company understands the fluctuating market and knows how to effectively tailor their services to their client’s needs. They are capable of coping with holiday orders, high-sale seasons, as well as last-minute promotion sales. In the same instance, when demand is low, a 3PL provider is able to quickly scale back. Since a client is typically not charged when services are not needed, this is a great advantage compared to having an in-house fulfillment center.

Outsourcing Logistics Provides a Market Expansion Opportunity

Working with a third-party logistics company can provide the opportunity for a business to expand into new regions. Certain areas may be physically impossible to reach on their own efforts or would cause a financial burden. In addition to this, the rules of logistics are ever changing. A business must comply with federal transportation regulations, which can become a hassle. 3PL providers have the experience and resources to handle these logistical issues. This essentially makes testing a foreign market accessible and less complicated.

As you can see, there are many benefits to utilizing a 3PL provider. Overall, it allows a business to effectively meet their market demands, as well as customer needs. In addition to this, it benefits their ability to operate cost-effectively, allocate resources where needed, and grow their business successfully.

Filed Under: Business, Logistics

September 20, 2018 by jromero

Post-Holiday Conversion – Successfully Creating Year-Round Customers

The holiday shoppers generated the high sales you were expecting, and along with that came the anticipated post-holiday slow down where the sparkle and the excitement have diminished. The eCommerce industry typically views this as a time where they take a hit, but it can be quite the opposite. A better way to look at it would be as an opportunity for post-holiday conversion where you have a chance to make long-term customers of your holiday visitors.

With the right planning, you can inspire customers and drive additional sales after the holidays. There are effective ways to achieve this, such as email marketing, loyalty programs, and incentives that are tailored to make a big impact. Let’s get started in going over a few marketing techniques that can give you a high post-holiday conversion rate!

Post-Holiday Email Marketing Can Spark Customer Interest and Keep it!

Now that the hustle and bustle of the season are over, your holiday customers are back to their daily routines and shopping is not at the forefront of their minds at this point. Fortunately, it’s possible to re-spark your post-holiday shopper’s interest by utilizing an effective email marketing campaign. With the number of email users growing, 3.7 billion in 2017, and an estimated 4.1 billion by the end of 2021, as shown in a study conducted by the Radicati Group, you can be sure your email marking efforts will be successful in turning your holiday shoppers into customers. Here are a few ideas to get your conversion goals on their way.

A Basic Follow-Up Email can Set the Stage for a Successful Conversion

The follow-up email is considered the most basic of emails within a marketing campaign, but don’t let this underestimate its value and effectiveness when it comes to increasing repeat engagement with your post-holiday shoppers. A follow-up email will enable a business to thank a customer or check-in to confirm their customer was happy with their purchase, as well as their shopping experience.

The main goal of the follow-up email is not so much to inspire click-through rates, but more to reintroduce your brand to the seasonal shopper, establish a relationship, and create a great customer service experience. This sets the stage for conversion. Although the click-through is not the main purpose, the underlying goal is still achieving a conversion, so a call-to-action should always be placed within the email.

Image Source: Betaout

This post-purchase email can cause them to feel appreciated and valued as a customer, which will increase the likelihood of a repeat sale and successful conversion. Incorporating a Thank You email with coupons is shown to have a successful click, open, and conversion rate compared to emails that do not contain coupons.

Image Source: Remarkety

Leverage New Year’s Resolutions to Create Long-Term Customers

Promote a New Year’s sale email campaign to put your business back on the customer’s radar before they are lost. A New Year’s sale focuses on the fact that most customers have New Year’s resolutions in mind. A business can leverage this by providing information on their products and services in a way that pertains to a “new beginning” and a “new you”. This will bring your marketing efforts to a personal level that can create a connection with your post-holiday shoppers. Be sure to seize the opportunity in targeting resolution minded post-seasonal shoppers by scheduling your email release soon after the New Year hits. 

Introduce Holiday Shoppers to Your Loyalty Program

Whether it’s during a customer’s holiday transaction or directly after the holidays, your shoppers should be introduced to your loyalty program. If your brand currently does not have a program in place, it’s imperative to implement a loyalty program to keep your customers engaged and increase the frequency of their store visits, as well as increase the amount of money spent as they try to reach their reward goals. If a program revamp or refresh is needed to make your loyalty program more successful, try adding incentives for customers to join, or hold a brainstorming session with your partners to come up with a creative program your post-holiday shoppers can’t resist. The bottom line is that loyalty programs make customers happy, they realize they are earning rewards as they invest money into your brand; it’s a win-win situation.

Up Your Membership Numbers by Offering an Incentive to Join

Like any marketing program, some thought and smart promoting are essential to be on top of your game. With that being said, you have a great chance of increasing your membership numbers by offering your holiday visitors an enticing incentive to join.

Advantages of implementing an incentive into your loyalty program:

  • Sparks customer interest
  • Creates a desire to join
  • Immediate positive emotion towards your brand
  • Stands out from other brand programs that only offer a free membership as the incentive

Image Source: Extended Stay America

While a free incentive can be viewed as taking a hit for some brands, in reality, it’s an investment that will be recouped at a certain point as the program member starts spending more to reap the rewards. In addition to this, your efforts will provide you with the conversion you were hoping for, as well as a loyal and longtime shopper.

Wow Your Post-Seasonal Shoppers With a Creative Loyalty Program

Impress your shoppers with a custom designed incentive program that is unique to your business. Creating a specialized loyalty program will catch your customer’s attention and can therefore increase program sign-up rates; this will enable your business to drive repeat purchases. Shoppers are bombarded with loyalty programs over the course of a year; so coming up with a loyalty program that stands out from the crowd is worth the time spent.

A few examples of creative program features:

  • Customer of the week that receives bonus points
  • Option to support a charity with earned points
  • Brands selling items such as crafts, fabrics, or meal preparation products can feature high point earners on social media to showcase their creations

Holiday Returns & Exchanges – An Opportunity to Gain Customers

The holiday season is over and most shoppers are done with every aspect of it and have moved on, but wait, there is still that item they are not quite happy with and they need to return or exchange it. For some shoppers, this is a task they are not looking forward to. This is where you apply your smart business know-how and turn an expected not so fun experience into a pleasant one that will impress your customer. The keys to a successful return are exceptional customer service and the motivation to change a return or exchange into a sale with the potential to build customer loyalty.

The Importance of a Positive Return or Exchange Experience

This is a wonderful opportunity to show a potentially unhappy customer what your brand is made of. Customer service that exceeds their expectations can go a long way and convert your seasonal shopper into a repeat customer. It’s essential to take the steps necessary to convert the customer before the transaction is over, if you are not successful, you may lose their future business.

Whether the return is in-person or completed online with prewritten messages, these tips can turn the post-holiday transaction into a positive experience for the customer:

  • Have a goal to exceed expectations
  • Listen to the customer’s concerns
  • Show sincere empathy
  • Provide suggestions
  • Offer incentives
  • Allow for free shipping on the returned item
Convert Returns into Sales with Limited-Time Offers

Post-holiday returns are inevitable, but as mentioned, there is an opportunity within every return transaction. To maximize your chances of converting your post-holiday returns into a conversion, offer a limited-time offer on purchases.

Advantages of limited-time offers:

  • Proven to be a powerful marketing tool
  • Changes the focus from returning to purchasing
  • Creates a sense of urgency

Image Source: Omaha Steaks

A test conducted by HubSpot in which A/B testing was performed using two identical pages with the exception of one stating it was a limited-time offer showed that the page that included the limited-time offer outperformed the non limited-time offer page by 8%.

Be sure to define your offer dates. Avoid vague dates such as, “While Supplies Last” or “Sale Ends Next Week”, these phrases might not produce strong results or create urgency. However, stating, “Today Only”, or “Ends This Friday”, are clearer and have a better chance of converting a holiday return into a sale.

A Little Creative Thinking will Help You Gain Year-Round Loyal Customers!

The holiday rush not only sends new customers your way, it also brings multiple opportunities. With this, your business can create successful post-holiday conversions that make long-time customers of your holiday shoppers. So get started on your email marketing, creative loyalty programs, and holiday return opportunities because it’s time to create customer relationships and repeat purchases!


Filed Under: Business

June 20, 2018 by jromero

Whether you will attending a business luncheon, wedding reception, or an upscale dinner party, you will want to be sure you are equipped with the knowledge of proper table etiquette. Having the know-how to make it through your get-together successfully will enable you to make a good impression, as well as not feel nervous about what you should or shouldn’t be doing.

If you have been a bit uncertain about which utensil to use during different times of your meal, or the proper way to pass food to the other guests, we would like to help. Here we will be discussing the Top Ten Table Etiquette Tips to give you a well-rounded view that will enable you to feel more confident, which will allow you to focus on enjoying your meal and your company.


It is customary to place your napkin in your lap while dining. If there is an individual hosting the luncheon or dinner, wait for this person to remove their napkin from the table. This is your cue to do so also. If there is no host, place your napkin in your lap immediately after you are seated. Unfold your napkin in your lap, it should remain there until it is needed or when the meal has officially ended. The host will typically signal the end of the meal by resting their napkin on the table. Your napkin should be neatly placed on the table to the left of your place setting when your meal is finished.


The instruction of keeping your elbows off the table has been installed in many of us from our first table experience. It is still considered, to this day, bad manners when you don’t follow this rule. Although we are in a day and age that is less formal, you never know who you might be dining with, and what their values are, so it is best to keep your elbows off the table to avoid being seen as unrefined. Keeping your elbows off the table will also assist with keeping your posture straight, which can give you a more sophisticated look while you are dining with your guests.


Depending on the setting you are in, most gatherings start with the wine being served as you are waiting for your meal to arrive. To have a more experienced look, it is important to hold your wine glass properly. White wine glasses are typically held by its stem, closer to the base. This not only prevents fingerprints from being left on the bowl of the glass, it also prevents the wine from warming up, as white wine is served chilled. Red wine, normally served at room temperature, can be held by the bowl. It is recommended to drink from the same side of your glass each time; this will prevent lipstick smudges from covering the entire rim of your glass. If you are the one tasked with pouring the wine, hold the bottle towards the base while pouring. Fill red wine glasses one-third of the way full, and white wine about halfway. Be sure to offer others more wine before pouring your second glass. Never drink more than your guests are drinking.


You might not give much thought to proper bread etiquette until the bread basket is sitting in front of you, it is then you wish you had brushed up on what is expected. Bread is commonly served before the meal arrives, and is most often placed in a basket for sharing. If the basket is closest to you, you may simply offer it to the person on your right. If you are tasked with cutting the bread, never touch the bread with your hands. It is proper to use the bread basket cloth if it is long enough. After you have cut the bread, offer some to the person on your left, and then proceed to pass the bread to your right.


It is very likely you will be asked to pass a dish or two, as well as the salt and pepper. Food should always be passed to the right. While passing to the person next to you, he or she might take the plate from you, or they may serve themselves while you are holding the plate. If a plate is noticeably heavy, it should be placed on the table as you are passing it. If the plate being passed contains a serving utensil, this should always be used instead of your own utensils. It often happens that someone will request the salt that is sitting nearby you, if this happens, always pass the salt and pepper together.


It is proper etiquette to not begin eating until everyone has been served. If you are in a situation where grace will be said before the meal, then eating can begin directly after. If you are unsure of when to start, follow your host’s lead, or begin when you see others have started. One exception to waiting until everyone is served can be in a buffet style setting, you will need to play it by ear and see if the other guests are waiting or starting their meal right away.


Learning which utensils to use and when can be extremely important if you would like to make a good impression. It can be a bit intimidating, but remembering the proper utensil usage can be achieved if you take a little time to review things. The general rule of thumb is to work your way in. Forks are placed to the left of your plate with the salad fork furthest from your plate, then the dinner fork, and dessert fork. On your right side, closest to your plate, you will find your salad knife, meat knife, dinner spoon, and your soup spoon.


Depending on your location, there are two traditional ways of handling utensils. The first would be the American style in which you hold your fork and knife in the same manner you would a pen. Your fork is placed in your left hand while your knife is in your right, you proceed to cut one piece, place your knife back down on your plate, and then place your fork in your right hand. European style would be to simply keep the fork in your left hand after cutting your food.


To avoid looking messy, it is best to not mix and move your food around on your plate too much. Keep food about an inch away from the rim of the plate to avoid accidentally knocking items off. If your meal is one in which cutting is required, do not cut all your food at once, only cut food into one or two bite-sized pieces at a time. This will help keep your plate looking organized and tidy.


You may have to leave the table momentarily because your phone won’t stop buzzing or you simply have to use the restroom, in these instances, you can politely excuse yourself and step away from the table. There is no need to inform the other table members why you need to leave.

There are many elements to consider when it comes to proper table etiquette, but once you get the basics down, you will do just fine. Below we have provided a handy formal place setting reference guide to help you familiarize yourself with all the items that may be placed in front of you at your next get-together. We hope our etiquette tips have made you feel that you can attend your next luncheon or dinner party with confidence. Enjoy your meal and the company!

https://jeanneromero-portfolio.com/table-etiquette-tips/

Filed Under: Etiquette, Events

June 20, 2018 by jromero

7 Tips for Creating Barista-Grade Drinks with Your Keurig Brewer

So you have your Keurig Brewer which allows you to enjoy a good cup of coffee while at home, but somehow you still end up at your local coffee shop for your quality frothy drink that you are accustomed to. You feel like you have the best of both worlds, right? Well, your world is about to get even better because we have 7 tips for you that will make it possible to enjoy those same barista-grade drinks that you crave, but they will be made by you, with your handy Keurig Brewer! Not only will you be saving tons of money by avoiding your daily visit to your nearby coffee shop, you will also be able to experiment with different drinks such as a variety of coffees and teas. Are you ready to utilize your Keurig Brewer and K-cups to the fullest? If so, let’s get started!

1. Use Filtered Water

Any serious coffee enthusiast will say filtered water is a must when creating a great cup of coffee. It makes sense since basic coffee typically consists of 98% water. Actually, you will be amazed at the difference a good water filter will make when it comes to the quality of your drinks. Filters make sure that chemicals and contaminants do not become one of the ingredients you put in your beverage, and that only the purest water makes it into your cup! This not only creates a healthier drink, but also eliminates any off flavors that will take away from the great tasting barista-grade beverage you were hoping for.

2. Buy Whole Beans and Grind them Fresh

There is nothing like the aroma of freshly ground coffee beans! This statement says it all and touches on the realization of why buying whole beans and grinding them fresh will make a world of a difference in creating barista-grade coffee. Take it one step further and make sure to buy the freshest coffee beans. This can be accomplished by shopping for your beans at local stores or farms. Once you have the perfect fresh bag of beans, you can grind them and enjoy the aroma! Grinding your beans immediately before brewing will produce rich flavors and a great cup of Joe. If you are wondering why, it’s simple, the coffee bean keeps its precious oils 100 percent fresh and uncontaminated. Once exposed to air, the coffee oils can absorb surrounding odors and become tainted, which will affect the taste of your coffee.

3. Properly Store Your Coffee Beans

Most people leave their coffee beans in their original packaging not realizing this will compromise the flavor of their coffee. Taking the time to store them properly can make a big difference in your coffee experience. It’s best to store your coffee beans in an opaque sealed container. Make sure to not keep the container too close to the stove due to the fact that heat can be harmful to the quality of your coffee beans. Get creative and shop for decorative containers that will not only keep your beans safe from the elements, but also add to your kitchen decor.

4. Homemade Froth

Are you one of those people who order extra froth on your beverages, or consider the froth the icing on the cake? We have good news, you can make your own froth right at home! Froth can make or break a drink for some, so we thought it was worthy of making our barista-grade drink tip list.

Firstly, let’s start with what type of milk should be used to create the best possible froth. It would seem that whole milk would produce the creamiest thickest froth, but surprisingly, the less fat the milk contains, the fuller and more barista-grade like your froth will be. So be sure to use 2% or low-fat milk for your froth. The simplest way to create your beverage froth would be to pour half a mug of milk into a mason jar, place the lid on tightly and shake vigorously for about 10 seconds. Next, remove the lid and place the jar in the microwave for 30 seconds, during this time you will see the froth rising to the top of the milk. Spoon the froth out of the jar and onto your drink. It’s that simple! If you would like to get a little more advanced and create even fuller froth, you can warm your milk and then mix it with an electric mixer or blender. Either way, it’s exciting to make homemade froth, wouldn’t you agree? Have fun and enjoy!

Now that you have some of the basics down, let’s move on to actually making some drinks with your Keurig Brewer and reusable K-cups. We thought we would start with some seasonal classics, as well as mix it up a bit by adding a few popular teas to the list!

5. Cozy Chai Tea Latte

If you are a fan of chai tea lattes then you already know what a treat it can be to enjoy one of these spicy yet sweet creamy drinks! The only thing that could possibly make this drink even better would be if you could make one in the comfort of your own home. Today is a great day because by the time you finish reading this, you will be capable of making your very own chai tea latte!

Here is what you will need:
• 1 chai tea bag of your choice
• 1/2 tsp. ground cinnamon
• 1/8 tsp. ground allspice
• 1/8 tsp. ground ginger
• 1/2 cup 2% or whole milk
• 1 tablespoon Coffee-mate French Vanilla Creamer
• Whipped cream (Optional)

Create Your Chia Tea Latte
Step 1: Add 1 chai tea bag, cinnamon, ginger, and allspice into a reusable K-cup. Snap lid shut and place in your Keurig Brewer.
Step 2: Using an appropriate size mug, start brewing your tea.
Step 3: In a small saucepan add and stir milk and vanilla creamer until heated thoroughly. Add mixture to your mug of tea.
Step 4: Create froth using the quick mason jar method and spoon onto your chai tea. Add a dash of cinnamon if desired.

For those of you who love to drink tea because of its great taste and health properties, we bring to you this highly creative tea mix that is packed with antioxidants, vitamins, minerals, and antibacterial properties. We recommend creating a batch of this custom blend and storing for daily use. The following recipe will make half a mason jar of dry mix that can be stored and used one K-cup at a time. Preparing the mix ahead of time will allow you to easily make your tea at a moments notice. This creative fruity tea blend has an amazing aroma that you will just love!

Here is what you will need:
• 1 cup dried hibiscus flowers
• 1/2 cup dried rose hips
• 1/2 cup dried peppermint leaves
• 1/4 cup dried orange peel
• 1/4 cup lemongrass
• 1/4 cup wild cherry bark
• A mason jar for storing remaining dry mix

Create Your Relaxing Cup of Tea
Step 1: Fill your reusable k-cup with the herbal blend, snap the lid shut, and place in your Keurig Brewer.
Step 2: Using an appropriate size teacup, start brewing your tea.
Step 3: Enjoy!

7. Perfect Pumpkin Spice Latte

Whether or not pumpkin season is here, who can resist a good pumpkin spice latte! We provide a great recipe that can be utilized in two different ways. You can make the full latte recipe with the milk mixture, or, skip the milk mixture and you will have a simple yet tasty Pumpkin Spice coffee. Either way, you are going to need a second cup, it’s that good.

Here is what you will need:
• 1 tsp. freshly ground cinnamon
• 1/2 tsp. freshly ground ginger
• 1/4 tsp. ground cloves
• 1/4 tsp. ground nutmeg
• Freshly ground coffee beans
• 1/2 whole milk
• 1 tbs. pumpkin puree
• 1/2 tsp. sugar
• 1/2 tsp. vanilla extract
• Whipped Cream (Optional)
• Cinnamon stick (Optional)

Create Your Pumpkin Spice Latte
Step 1: In a small bowl, add enough coffee grounds to fill your K-cup 75 percent of the way. Add the cinnamon, ginger, cloves, and nutmeg. Mix well.
Step 2: Add spiced coffee ground mixture to your reusable K-cup. Snap lid shut and place in Keurig Brewer.
Step 3: Using an appropriate size mug, start brewing your spiced coffee.
Step 4: In a small saucepan, warm the milk. Add the sugar and vanilla extract and stir until dissolved. Mix in the pumpkin puree until well blended.
Step 5: Pour milk mixture into mug with brewed coffee.
Step 6: Top-off with whipped cream or froth. Sprinkle with cinnamon or nutmeg, or add a cinnamon stick for decoration!

We hope that after reading our 7 tips that you will start creating awesome barista-grade drinks with your Keurig Brewer and reusable K-cups!

Filed Under: Coffee, Tea

  • 1
  • 2
  • 3
  • Next Page »

Search This Site

Copyright © 2025 · Executive Pro Theme on Genesis Framework · WordPress · Log in